LED Mask v1.0 Instructions
Installation Instructions
Dependencies
This gimmick depends on the following packages. Make sure you have installed them before you install this gimmick.
- Modular Avatar (1.9.13 or higher): https://modular-avatar.nadena.dev/
- lilToon (1.7.3 or higher): https://lilxyzw.github.io/lilToon/#/
- Gesture Manager (3.9 or higher): https://github.com/BlackStartx/VRC-Gesture-Manager
Importing Unity Package
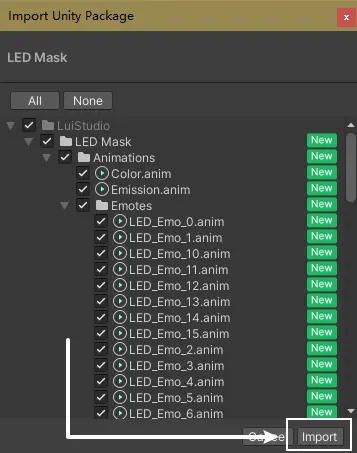
Drag LED Mask.unitypackage into Project window, click the Import button on the dialog to import the package to your avatar project:
Installation for Compatible Avatars
1. Import DLC Package
Find the DLC resources, drag the unitypackage file into Project window, click the Import button on the dialog to import the package to your project.
2. Add Prefab to Scene
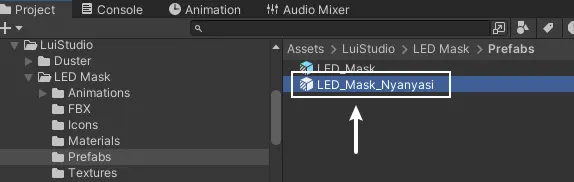
Enter the folder Assets/LuiStudio/LED Mask/Prefabs and find the prefab named with the original name of your avatar (しろいの's にゃにゃし for example), which as the image below:
Drag the found prefab into the avatar, the hierarchy sould be like the image below:
![]()
3. Testing
Enter Play Mode with Gesture Manager, Find and turn on the LED Mask in the action menu, manually set the gestures to test the mask emotes.
If you are not satisfied with the mask emotes and would like to animate them. Unfortunately, it would be very complex if you do manually. It is recommended to follow Customize Mask Emotes and start from the beginning.
If you insist to animate them manually, these hints might be helpful:
The MA Merge Animator components inside the mask prefab acts as different usage, the first one is for transforming, the second one is for LED patterns, controllers' contents inside these two components sould be the same as the avatar's FX controller.
Please do not modify the third component's controller in normal situation.
Well Done
You have done the installation for a compatible avatar. Head to How to Use and try it in VRChat.
Installation for Compatible Avatars endInstallation for Incompatible Avatars
1. Add Prefab to Scene
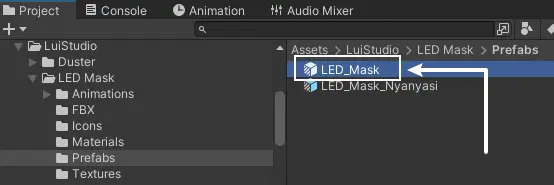
Find LED_Mask.prefab from the folder Assets/LuiStudio/LED Mask/Prefabs:
Drag the prefab into your avatar, and make sure there's only one LED mask prefab in your avatar. After doing this, the hierarchy sould be like the image below:
![]()
2. Adjust the Shape of the Mask
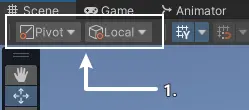
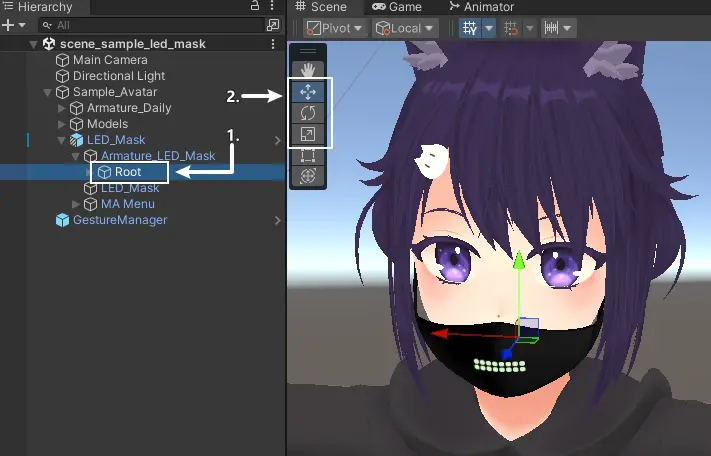
Before following this step, please set the tool settings at the top-left corner of the scene window to Pivot and Local[1]:
Due to difference between avatars' head and bones, we need to adjust the shape of the mask until it fits the avatar.
Select LED Mask Prefab/Armature_LED_Mask/Root[1], use the Move Tool, Rotate Tool and Scale Tool to roughly adjust the position, rotation and scale for the mask:
If there're any parts of the avatar blocking the view, you could hide them temporary in hierarchy window.
After the adjustmment, the mask could be like this:
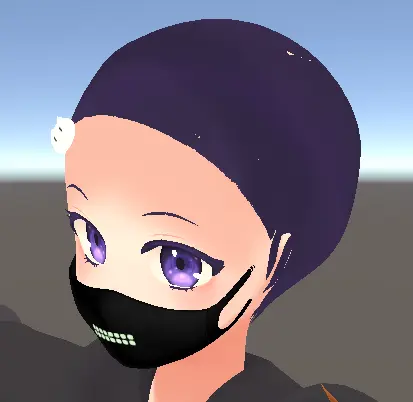
The mask still looks unfit for the avatar's face. We need to fine-tune the shapes of different parts of the mask. Unfold Root to reveal the bones of the mask:
It looks complicated, let's sort it out and solve them one by one:
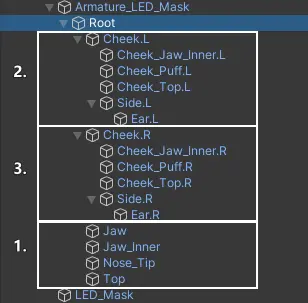
We divided them into 3 parts, now let's adjust them one by one.
1. Adjust the Middle of the Mask
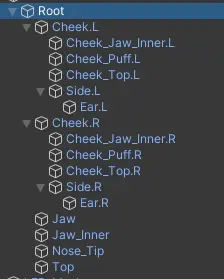
The middle of the mask contains bones Jaw, Jaw_Inner, Nose_Tip and Top. Here is the reference for them:
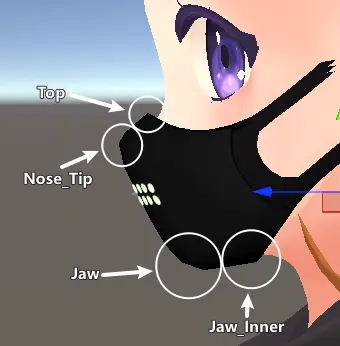
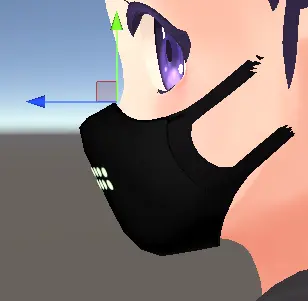
Select them and use Move Tool and Rotate Tool to fine-tune the shape.
For example:
2. Adjust the Left Side of the Mask
This part contains bones Cheek.L、Cheek_Jaw_Inner.L、Cheek_Puff.L、Cheek_Top.L、Side.L and Ear.L. Here is the reference for them:
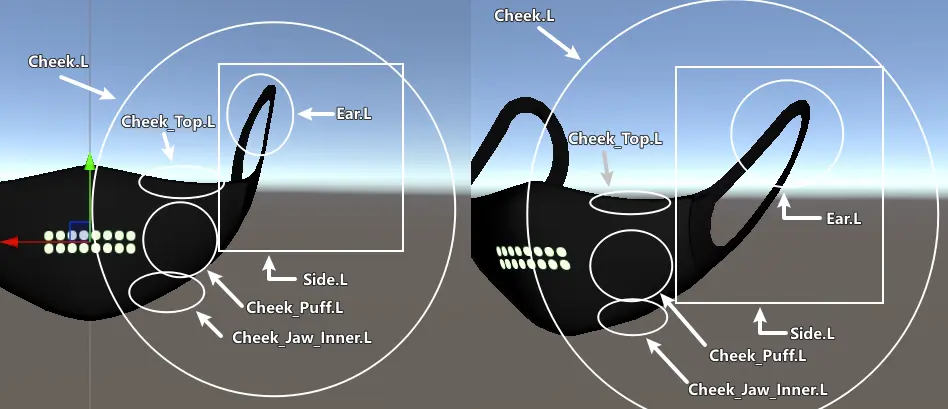
Please adjust them with the order of hierarchy, from the outside in, as below:
- Cheek.L
- Cheek_Jaw_Inner.L, Cheek_Puff.L, Cheek_Top.L, Side.L
- Ear.L
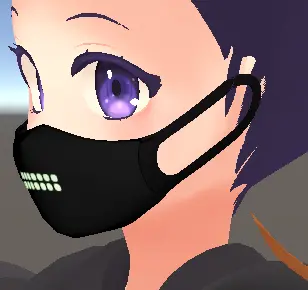
Adjust them until you're happy. For example (Please ignore that my avatar has no ears😭):
3. Adjust the Right Side of the Mask
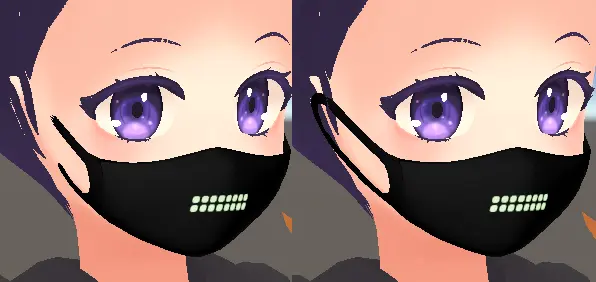
The right side of the mask is basically a mirror of the left side (If the head of your avatar is symmetrical). I provided a tool to mirror one side of the mask to the other.
Go to Tools > LuiStudio > LED Mask > Mirror Bones from the menu bar to call out the Mirror LED Mask Bones window. Drag the LED Mask prefab inside your avatar into the LED Mask field:
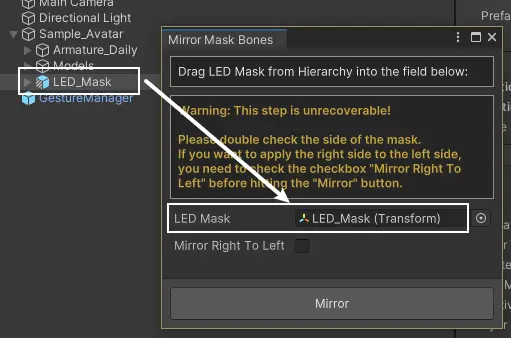
If you were adjusting the right side of the mask in the last step, please check the Mirror Right To Left checkbox.
Click on the Mirror button, the mask will become symmetrical.
If the mask is not mirrored by the way you have expected, please press down Ctrl + Z to undo the process.
4. (Optional) Adjust the Pattern Size
The LED pattern could be warpped after the adjustment. We could fix it by setting the shader property.
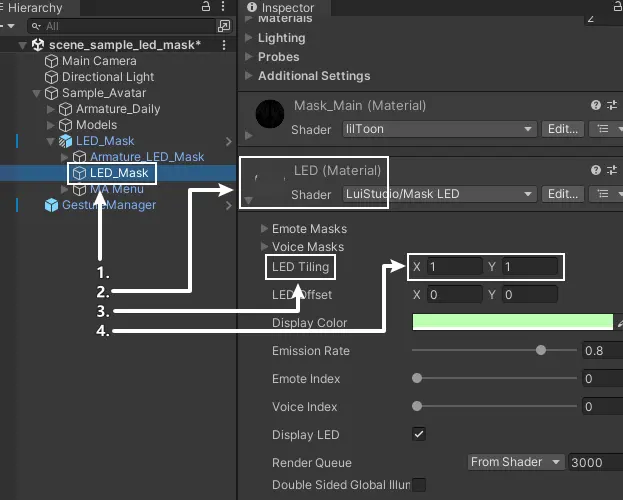
Select LED Mask Prefab/LED_Mask[1] and head to Inspector. Scroll down and unfold LED (Material)[2]. Find the LED Tiling[3] property, set the X and Y value until you're satisfied:
3. Customize Mask Emote
1. (Optional) LED Pattern Reference
The reference is helpful for the subsequent steps.
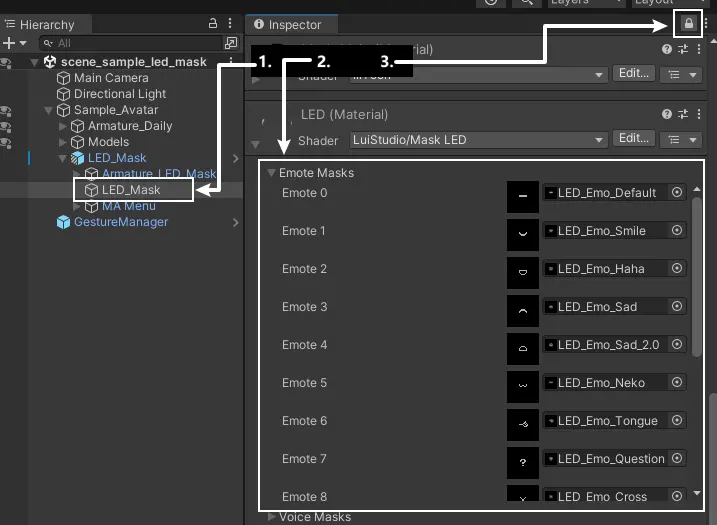
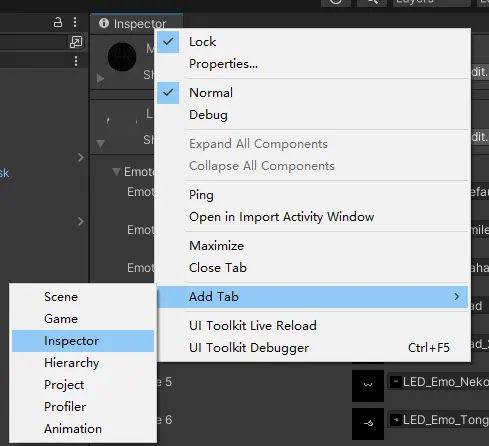
Select LED Mask Prefab/LED_Mask[1] and head to Inspector. Scroll down and unfold LED (Material). The Emote Masks[2] list will be the reference of LED patterns. The numbers behind each Emote are the indexes of the patterns. Click on the 🔓[3] icon at the top-right corner to lock the Inspector:
We need another Inspector window for other works.
Right click on the tab Inspector, select Add Tab > Inspector.
Drag the window tag to freely move the window and dock onto wherever needed. It is recommended to drag the window for reference to avoid stacking with the new window. This would reduce the tediousness of subsequent steps.
2. Initialize the Mask Emote Setup Tool
The setup tool can be used to preview the given avatar's FX layer animations. It also can be used to setup LED pattern for mask and deal with conflicts between mask and avatar using Animation window.
The setup tool is not fully tested. We suggest that you backup your avatar files before the subsequent steps.
LuiStudio will not be responsible for any damages incurred while using this tool without a backup.
We welcome any feedback on bugs encountered during use.
The tool will call out the Animation window if there's no Animatino window opened in Unity editor. Please make sure the Animation is opened.
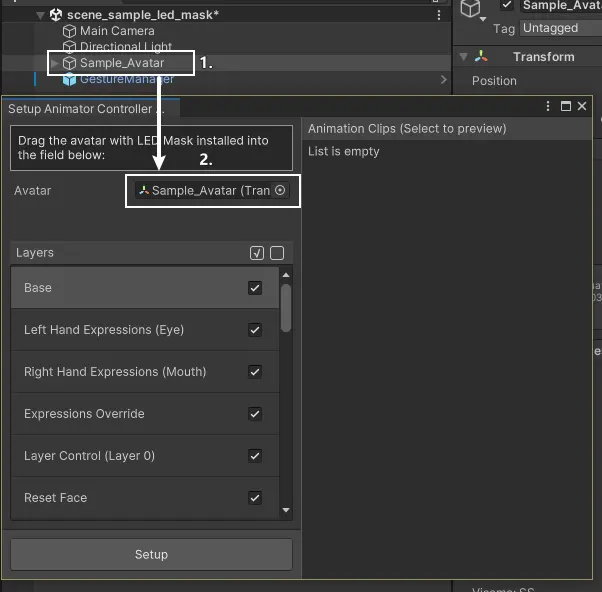
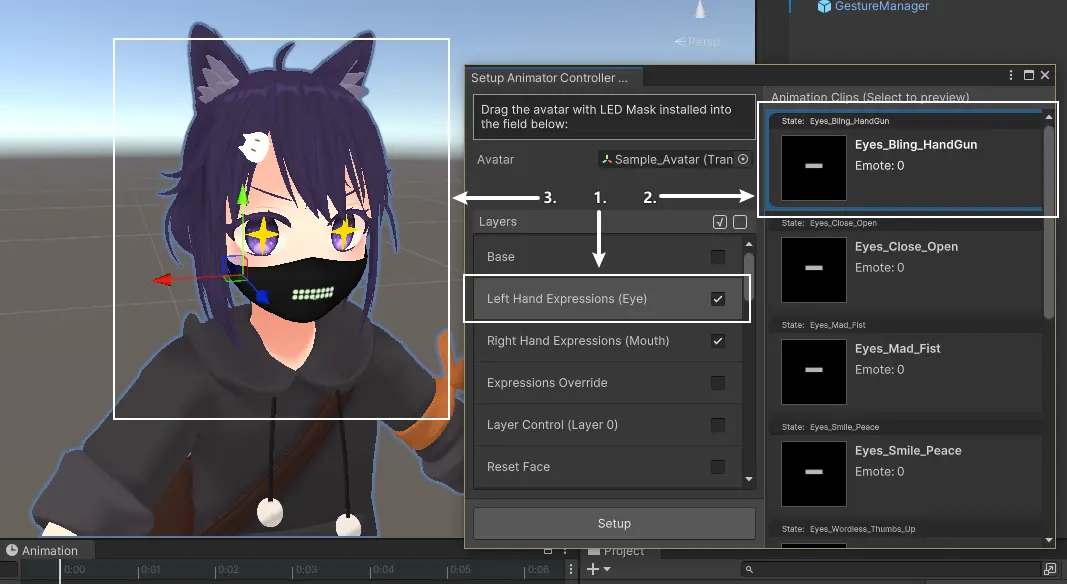
Goto Tools > LuiStudio > LED Mask > Setup Animator Controller from the menu bar to call out the setup tool window.
Drag your avatar[1] from the Hierarchy into the Avatar field[2], and wait for the tool to initialize (The initialization duration increases with the complexity of the FX layer animation controller):
3. Customize Emote with Setup Tool
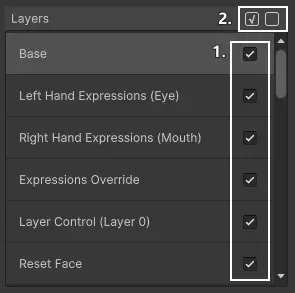
1. Uncheck Unnecessary Layers
Uncheck the layers that are not related to face emotes, this means we are not baking these layers into the final animator controllers.
Click on the checkboxes[1] inside layer items to check / uncheck layers, you can use the check all / uncheck all buttons[2] while needed:
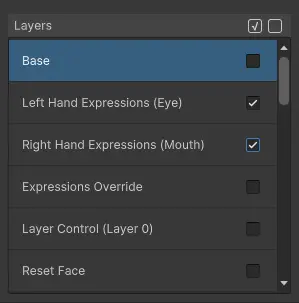
For example:
2. Preview Animations from Layers
Select the layer[1] in the Layers column, then click on any animations[2] in the Animation Clips column to preview them in the scene (Click again to cancel preview):
The preview mentioned above is by replacing the controller inside Animator component of your referenced avatar, and enable preview in Animation window. Normally, the controller will be recovered after stopping preview (The controller recovery will be failed if Unity is being shutdown abnormally while the tool is on and previewing animations).
3. Modify Mask Emote
We can modify the emote in Animation window while previewing.
To maximize the customizability, this step will modify the animation directly through Unity's Animation window. Please strictly follow the steps below if you are not familiar with Unity animation operations.
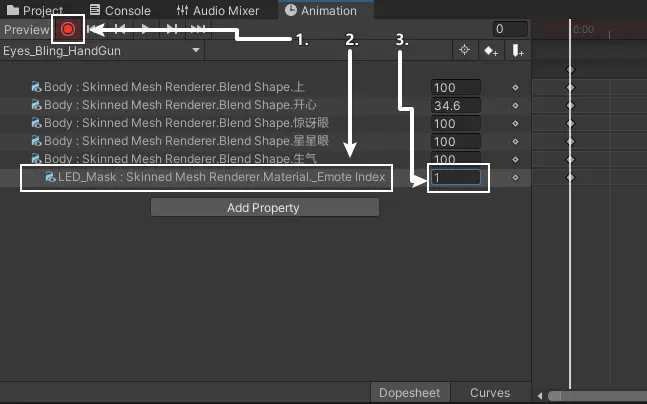
Modify LED Pattern
Head to Animation window and enter recording mode. In the timeline, the property LED_Mask : ..._Emote Index[2] is the property of the index of the pattern. Other properties are from the original Avatar's animation. Change the pattern index (0 ~ 15)[3] to change the LED pattern for the mask, if you want to apply the default pattern (Details in Notices - (2)) please directly delete the index property:
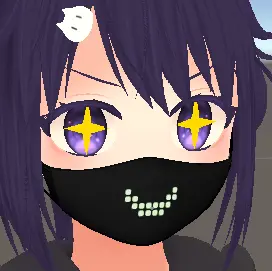
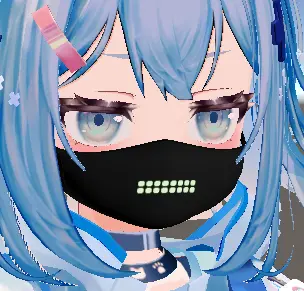
This is a example after you changing the pattern index:
Handle Conflicts
If the mask has conflicts with your avatar, please handle them according to suggestions below (We are using しろいの's にゃにゃし's puffed cheek emote as an example):
If you want to use the avatar's original emotes as references while the mask is blocking the view. You can temporary hide the mask by clicking the eye icon next to LED mask prefab in the Hierarchy.
-
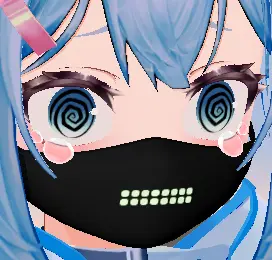
Conflicts Caused by Facial Deformations of the Avatar As the image:
We suggest adjusting the shape of the mask:
Make sure the
recording modein Animation window is on[1]. Select the LED mask's bones that need to be adjust[2] (which isCheek_Puff.Lin this case), and useMove Tool,Rotate ToolandScale Tool[3] to adjust them: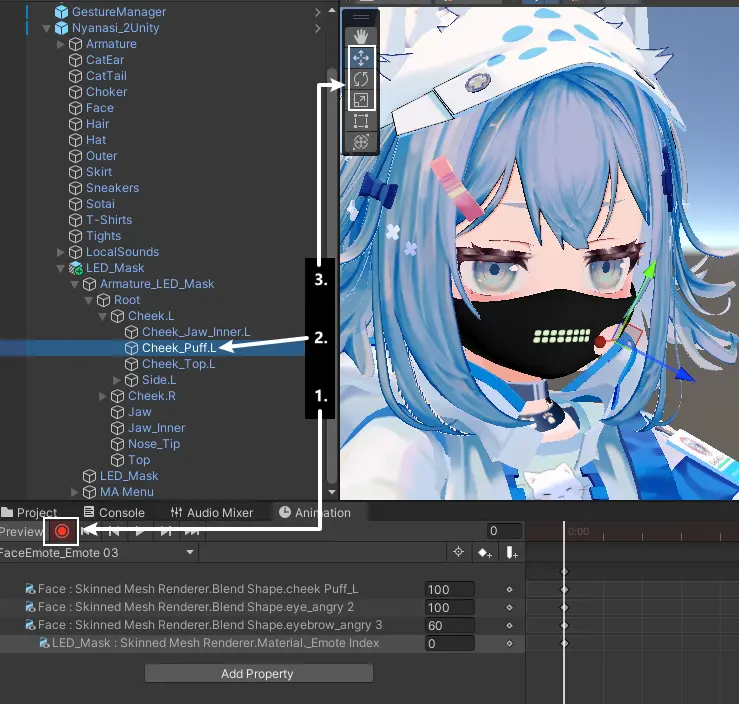
An example after finishing the adjustment:
-
Conflicts Caused by Emanatas of the Avatar
As the image:
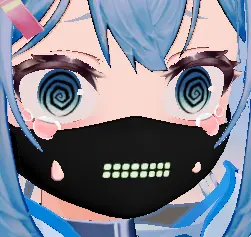
We suggest adjusting the shape of the mask or adjusting the emanatas:
In this case, the conflict by the tears above seems can be solved by adjusting the shape of the mask. We adjust the shape of the mask and make the tears fully reveal.
Make sure the
recording modein Animation window is on. Adjust the shape of the mask according to the last suggestion. Move the top corner of the mask back a little, and here's the result: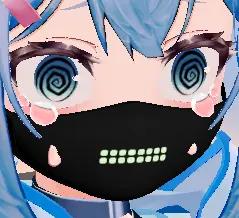
The conflict by the sweat below seems can only be solved by hiding them.
Normally, emanatas are driven by the
blendshape(shape key)in the face mesh, which also in this case. If the emanatas are seperated to different Gameobjects, please follow the steps of last suggestion.Make sure the
recording modein Animation window is on[1]. Locate the game object that contiains blendshapes, usually namedBodyorFace[2]. Select it, and findSkinnedMeshRendererin Inspector, unfoldBlendShapes[3], then find and change the related shape key value.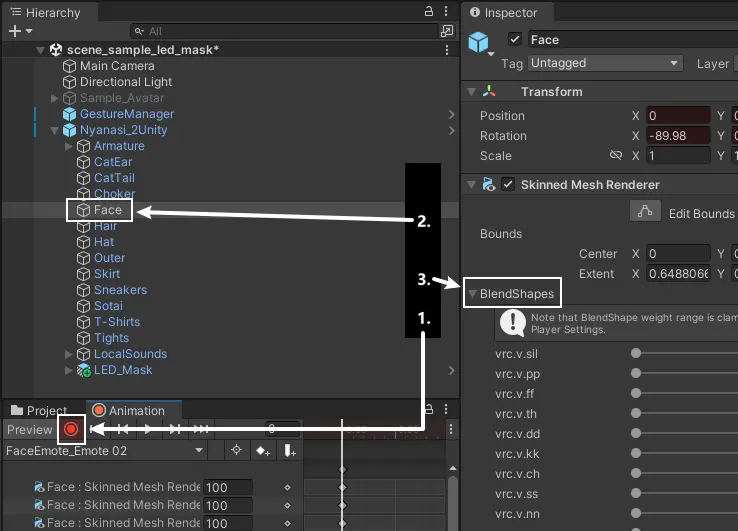
Here's the example after adjustment:
4. Customize the Rest of Mask Emotes
Repeat the steps Preview Animations from Layers and Customize Mask Emote to complete the customization for all the mask emotes you need.
5. Apply Mask Emotes
After finishing all the customizations, click the Setup button in the setup tool, and wait for the tool to generate animator controllers for LED mask.
The generated controllers will be automatically reference to the MA Merge Animator components inside LED mask prefab.
6. Testing
Enter Play Mode with Gesture Manager. Find and turn on the LED Mask in the action menu, manually set the gestures to test the mask emotes.
7. Notices
-
(1) About multple layers When you checked more than 1 layers in the setup tool (Such as the しろいの's にゃにゃし we used as example above, it has a layer for gesture emotes and a layer for petting head), please care about the override between layers, the layers behind will override the same property in the layer in front.
-
(2) About default states of different Write Defaults(WD) settings The default state means that the value of a property when it is not being animated. Such as the LED pattern index when it's not animated(not added in the animation clip). Every state in avatar's FX controller has WD option. We can check the avatar's write defualt setting by checking write default option in any state inside the controller.
- WD On If your avatar uses WD On, the default state of the LED mask would be the state in the scene under edit mode(not preview mode or play mode).
- WD Off
If your avatar uses WD Off, the setup tool will add a new layer into generated controllers for representing the defsult state. In this situation, the default state would be the state in the scene under edit mode(not preview mode or play mode) while pressing
Setupbutton.
These means, if your avatar uses WD On, and you want to customize the default state, just modify the mask in edit mode and you're good to go. If your avatar uses Wd Off, you need to modify the mask in edit mode before clicking
Setupbutton. -
(3) About the keyframe of LED pattern index If you deleted the property of LED pattern index(..._Emote Index) and want it back. Please make sure to change the tangents' modes to constant after you adding: Select every frame[2] of the LED pattern index property[1], right click on them and select
Both Tangents > Constant[3]: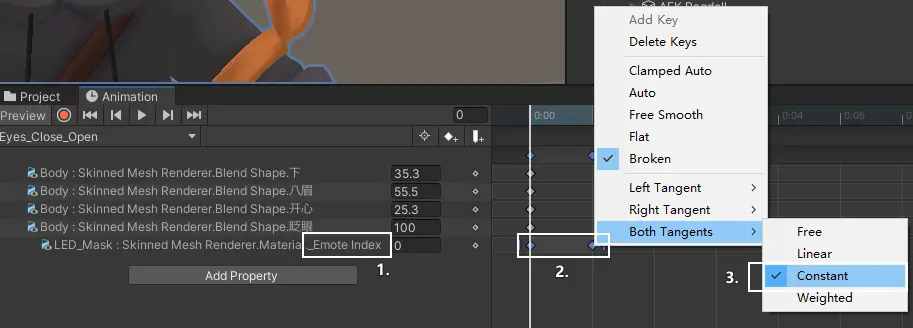
Well Done
You have done the installation for a imcompatible avatar. Head to How to Use and try it in VRChat.
Installation Instructions endCustomize Emote Patterns
The LED shader of the mask supports up to 16 emote patterns and 4 voice patterns. The pattern index we mentioned above is related to emote patterns. The texture of the LED shader is being recognize as mask, while the red value of a pixel is higher, it's opacity will also be higher. You can import a pattern created by yourself, or import a pattern made with LED Pattern Painter.
1. Use the LED Pattern Painter
This gimmick included a tool, we can use it to draw and generate pattern texture and use it in unity.
1. LED Pattern Painter Introduction
Go to the folder with this instruction, open the file LEDPatternPainter/painter.html with a web browser.
This is how the painter looks like:
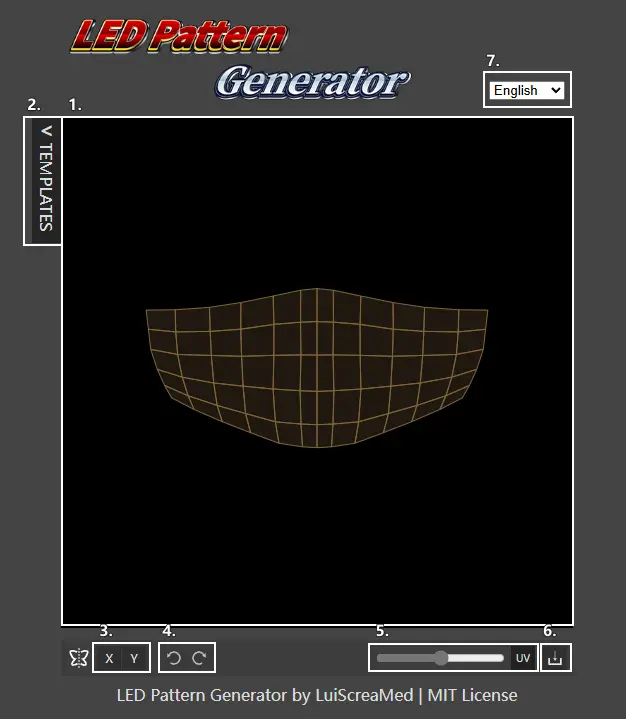
Here's the discriptions for labels in the image:
- Canvas;
- Template Pattern List Toggle: Used to apply templates onto the canvas;
- X/Y Axis Mirror Switch: With this enabled, drawing and erasing operations will be mirrored along the specified axis;
- Undo / Redo Button;
- UV Button: Used to show / hide the uv of LED pattern area;
- Save Button;
- Language Select;
2. Draw and Save Pattern
Hold the left mouse button in the canvas to draw LED pixel, hold the right mouse button to erase. Click on None in template patterns to clear the canvas.
Make sure the LED pattern is inside the area of UV, otherwise we need to adjust the LED shader properties while using this pattern.
Click the save button to save the pattern. Locate the saved file, drag it into wherever you want in Unity's Project window, and rename it whatever you want.
2. Apply the Pattern
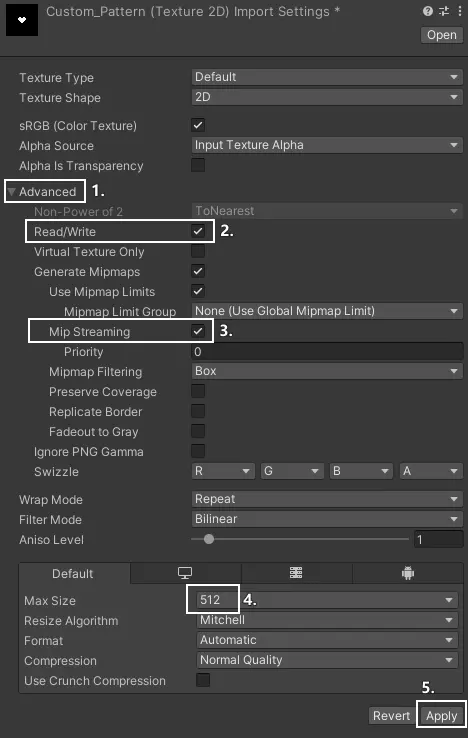
1. Import Settings
Select the imported texture in Project window. Head to Inspector, unfold Advance[1], check Read/Write[2] and Mip Streaming[3], set Max Size below to 512[4], then hit Apply[5]:
2. Replace Patterns
Select LED Mask Prefab/LED_Mask[1] in Hierarchy and head to Inspector. Scroll down and unfold LED (Material)[2]. Unfold Emote Masks[3] and replace the original pattern to your new pattern.

After the replacement, use the pattern by changing the LED pattern index to your new pattern in emote animations.
Customize Emote Patterns endHow to Use
You've done the installation, it's time to try it out in VRChat.
Turn on the action menu, locate the submenu called LED Mask, the buttons inside the menu acts as below:
Mask: Used to show/hide the mask;LED: Used to show/hide the LED on the mask;Voice: Used to turn on/off the voice reaction of the LED;Color: Used to set the color of the LED;Emission: Used to set the emission of the LED;
Miscellaneous
Change the Submenu Position in Action Menu
The submenu is installed to the root menu by default, that's not friendly to avatars having many other gimmicks. You can change the position of it using Modular Avatar:
- Select
LED Mask Prefab/Menu/LED_Maskin Hierarchy; - Head to Inspector, click on the
Select Menuinside theMA Menu Installercomponent; - Select the menu where you want to install into.