Rotating Beacon v1.0 Instructions
Installation Instructions
Dependencies
This gimmick depends on the following packages. Make sure you have installed them before you install this gimmick.
- Modular Avatar (1.11.0 or above): https://modular-avatar.nadena.dev/
- lilToon (1.8.3 or above): https://lilxyzw.github.io/lilToon/#/
Importing Unity Package
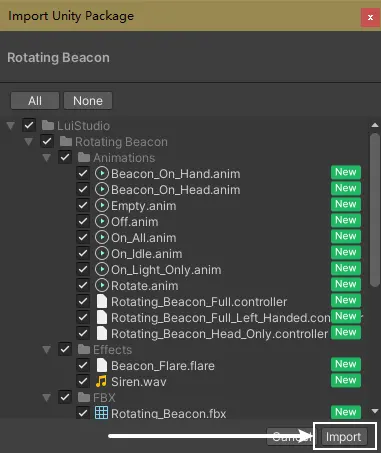
Drag Rotating Beacon.unitypackage into Project window, click the Import button on the dialog to import the package to your avatar project:
Adding Rotating Beacon to Your Avatar
1. Add the Prefab to Scene
There are different type of prefabs for several usages, please pick the prefab you want as below:
Rotating Beacon(Head Only)- The beacon will always stay on top of avatar's headRotating Beacon(Full)- The beacon can be grabbed on right hand, and can be put onto the top of avatar's head from right handRotating Beacon(Full)(Left_Handed)- The beacon can be grapped on and can be put onto the head from left hand
Specifically, the Full prefab uses a bit more synced parameter than Head Only prefab (3 bits -> 4 bits), and it uses Contact Sender, Contact Receiver and also VRC Parent Constraint. Head Only prefab is recommended for PC players and players care about performance.
Please choose Full prefab according to proper hand. Prefabs handle specific hand gestures, if you added a prefab for one hand, and put the beacon onto the other hand, there would be grabbing issues.
Drag and drop the prefab you've selected from project window into your avatar inside hierarchy (We use Rotating Beacon(Full) as an example):
![]()
2. Setup the Rotating Beacon
1. Setup for Head Only Prefab
After dragging the prefab, we can see a beacon in the scene, which is 1.5 meters from the ground:
![]()
1. Adjust the Position for the Beacon
Select Prefab/Model[1] in hierarchy, use Move Tool, Rotate Tool and Scale Tool[2] to adjust the beacon's position and it's size:
![]()
Move the beacon on top of avatar's head:
![]()
After doing this, you can check out Extra Setup.
2. Setup for Full Prefab
In this Section, we use Rotating Beacon(Full) as an example, which is for right hand.
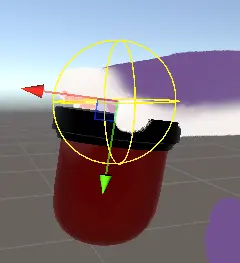
After adding the prefab, There will be a beacon 1.5 meters from the ground, and a Contact Sender shown as yellow sphere near the corresponding hand:
![]()
1. Adjust Beacon's Position On Avatar's Head
Select Prefab/Constraint Parents/Head[1] in hierarchy, use Move Tool, Rotate Tool and Scale Tool[2] to adjust the beacon's position and it's size:
![]()
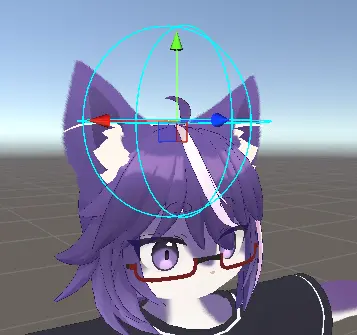
Move the beacon on top of avatar's head:
![]()
2. Adjust Beacon's Position On Avatar's Hand
As we are able to switch the beacon between avatar's head and hand with Full Prefab, we need to adjust it's position on corresponding hand.
Select Prefab/Model[1], go to Inspector and find component VRC Parent Constraint[2]. Inside the component, there's a source list, change the Weight of Element 0 [Head] to 0[3], then change the Weight of Element 1 [Hand] into 1[4]:
![]()
As we can see, the beacon moves to near the corresponding hand:
![]()
Select Prefab/Constraint Parents/Hand, move it to avatar's hand. The reference for the position:
![]()
3. Adjust Hand's Contact Sender and Head's Contact Receiver
Sender on hand and receiver on head are used to consider where the beacon should be when it moves between hand and head. We need to adjust them according to the positions and scales of avatar's corresponding hand and head, generally, making them larger than hand and head ensures the condition passes with less strictness (If they are too small, the Sender might not be able to contact the Receiver due to controller positioning issues while using with VR headset).
Select Prefab/Constraint Parents/Hand/Contact Sender, use Move Tool and Scale Tool (Or set Position and Radius in Contact Sender component) to adjust the postition and the size of the Sender. Example:
Select Prefab/Constraint Parents/Head/Contact Receiver, use Move Tool and Scale Tool (Or set Position and Radius in Contact Receiver component) to adjust the postition and the size of the Receiver. Example:
3. Extra Setup
1. Change the Submenu Position in Action Menu
By default, the submenu for rotating beacon is at the root of Action Menu, which is not friendly to avatars having lots of gimmicks. We can change the position by setting up MA Menu Installer component:
- Select
Prefab/Menu/Rotating Beacon - Go to Inspector, click on
Select Menubutton inMA Menu Installercomponent - Select the menu you want to place into
2. Hide the Beacon in VRChat Avatar Preview
The avatar preview in VRChat shows the final state of the avatar in Unity. Which means, if the beacon has not been disabled in Unity, it would also be shown in VRChat avatar preview. We can hide the beacon in Unity and VRChat avatar preview by doing these:
- Select
Prefab/Model - Uncheck the checkbox at the top of Inspector (Disable the beacon)
3. Adjust the Sound Clip and Volume When the Beacon is On
Find Prefab/Model/Bulb/Audio in Hierarchy, then find the Audio Source component in Inspector. If you need to replace the sound clip, drag the imported new sound clip into the AudioClip field; If you need to adjust the volume, just adjust the Volume in the component.
How to Use
You've finished the installation, let's talk about how to use it in VRChat.
Show/Hide the Rotating Beacon
Open the Action Menu, find and enter the Rotating Beacon submenu, the Rotating Beacon toggle in the submenu is for showing/hiding the rotating beacon.
Move the Beacon between Head and Hand (For Full Prefab Only)
After showing the rotating beacon, the beacon can be on top of head or on hand:
- When the beacon is on your hand, make sure the hand is not open and move it above your head (Specifically into the head Contact Receiver), then open the hand, the beacon would be on top of your head.
- When the beacon is on top of your head, make sure the corresponding hand is not in fist and move it above your head (Specifically into the head Contact Receiver), then make the hand into fist, the beacon would be on the corresponding hand.
In addition to the above, you can also use the On Head switch in the Rotating Beacon submenu to toggle the position of the rotating beacon.
Turn on/off the Rotating Beacon
The Activate toggle in the submenu is for turning on/off the beacon, and the Siren toggle is for turning on/off the siren sound while the beacon is on.